How to Add Vertical Line in Google Docs
Add a vertical line in Microsoft Word to draw attention to special content or help define elements.

Image: Microsoft
The article How to add horizontal lines to a Word 2016 document shows you two ways to add horizontal lines to a Word document. It's simple, and the results are easy to manage. Adding a vertical line is just as easy but isn't always as intuitive. In this article, I'll show you four ways to add vertical lines to a Word document:
- Add a shape
- Add a bar tab
- Add a border
- Attach to a column
We'll be looking at different ways to add vertical lines; we won't explore more advanced uses of lines.
LEARN MORE: Office 365 Consumer pricing and features
I'm using Office 365 on a Windows 10 64-bit system, but you can work with earlier versions of Word. The techniques in this article aren't supported by the browser edition. You won't need a demonstration file; just open a blank document and follow the instructions. I used the =Rand() function to produce generic content. Although I'm using Microsoft Word, most of the Office 365 apps support vertical lines to some extent.
Add a shape
Using the Line shape to insert, or draw, a vertical line might be one of the easiest routes. You click a few times and it's there. Let's look at a simple example:
- Click the Insert ribbon and then choose a line shape from the Lines section in the Shapes drop-down (in the Illustrations group). The mouse will change to a crosshair pointer.
- Click anywhere in the document. Hold down the Shift key and drag and click to create the line's opposite point. Holding down the Shift key ensures that the line is straight, as you can see in Figure A.
Figure A
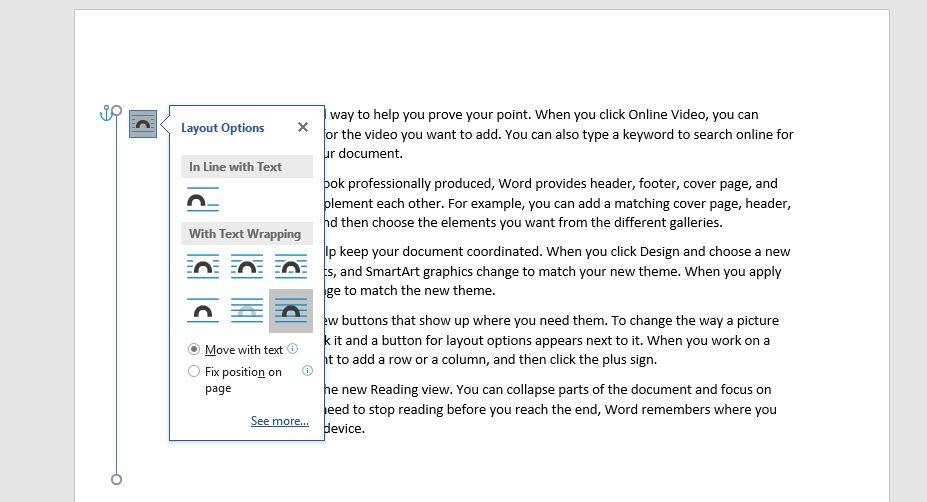
Insert a line shape.
If you click the screen tip to the right, you'll find several layout options for the line. This is simply a quick route to the Position and Wrap Text options on the contextual Shape Format tab. How you want the line to interact with surrounding content will determine your choices. On the Shape Format tab, you'll also find options for changing the line's color, size, and other special effects.
You can copy, move, or resize this line. Either endpoint can be adjusted by dragging either point left or right. The point you aren't moving will remain anchored to its position.
SEE: 30 things you should never do in Microsoft Office (free PDF) (TechRepublic)
If you want both points to move, hold down the Ctrl key while you move one point or the other. The line responds similar to a child's seesaw, as though the line were centered on a fulcrum, but only at first because you can drag the point a full 360 degrees.
To delete the line, simply select it and press Delete.
Add a bar tab
A bar tab is a measurement; don't confuse it with the tab bar that appears at the bottom of an app screen or a running total for beverages at your favorite pub. Using Word, you'll set a bar tab the same way you set any other tab, but instead of inserting a true tab, you'll insert a black vertical line. We can illustrate this process with a simple example:
- Select the paragraph(s) that you want to add the vertical lines too. Bar tabs always go with paragraphs.
- On the Home tab, click the Paragraph group's dialog launcher.
- In the resulting dialog, click the Tabs button (in the lower-left corner).
- In the resulting dialog, enter a horizontal measurement that identifies where you want the bar into the Tab stop position control. For instance, if you want the bar at the right margin, you might enter 6.5 (Figure B).
- Click the Bar button in the Alignment section and then click Set.
As you can see in Figure C, Word inserts a vertical line at the right margin for only the selected paragraph(s). This is a paragraph format; if you move the paragraph(s), you also move the line. If you delete the paragraphs, you delete the line.
Figure B
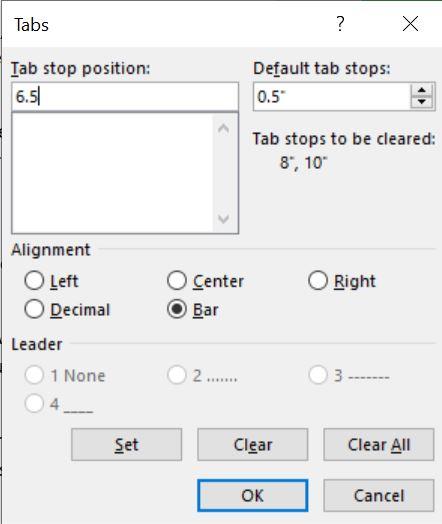
Figure C
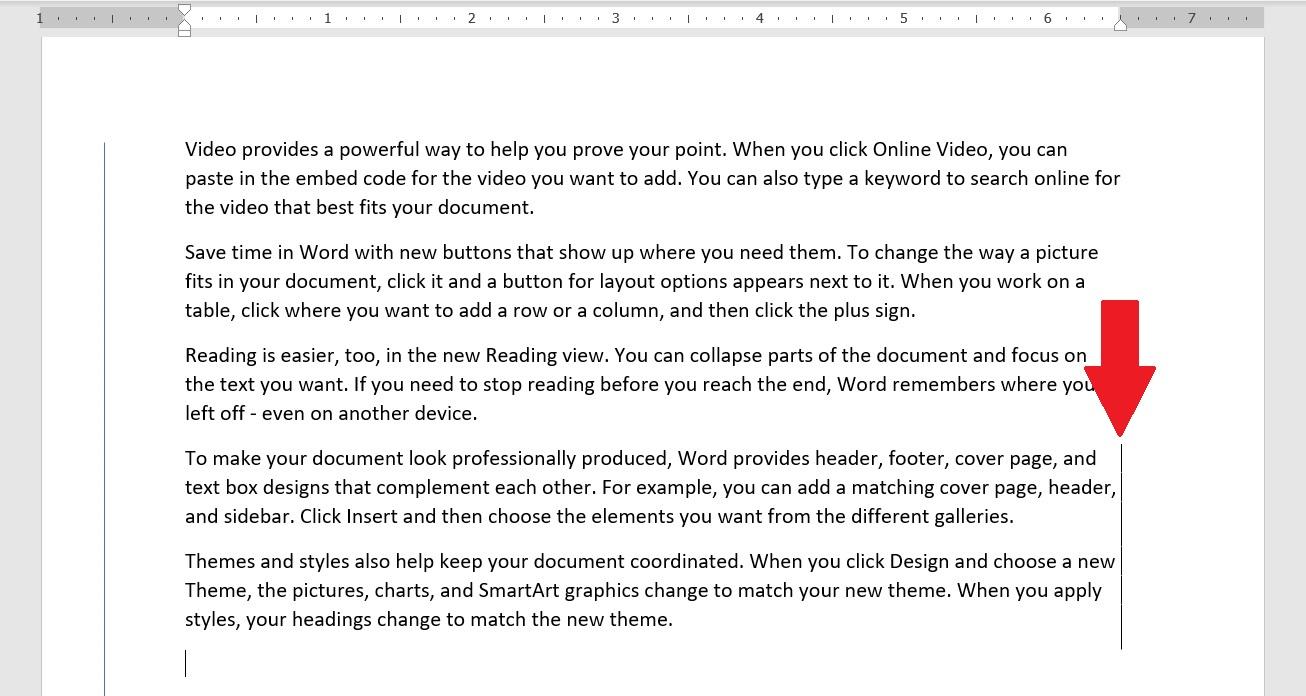
Add a line at the right margin using a bar tab.
To delete the vertical line, delete the bar tab.
Add a border
Similar to the bar tab, you can add a vertical border. The bar tab produces a single line, while the border option has more options. Let's add a border to one of the paragraphs as follows:
- Click anywhere inside the paragraph you want to enclose with borders.
- On the Home tab, click the Borders dropdown in the Paragraph group to display a list of border options.
- For this example, click the Outside Borders option (Figure D) to add the border shown in Figure E.
Figure D

Choose a border option.
Figure E

We enclosed the first paragraph completely.
Similar to the bar tab, the border goes with the paragraph. To remove the border, choose No Border from the dropdown.
Attach to a column
This final method is just as easy as the others, but columns have many options that deserve an article or even two of their own. For our purposes, we'll not venture beyond inserting a vertical line between columns. I'll leave it to you to explore columns more fully.
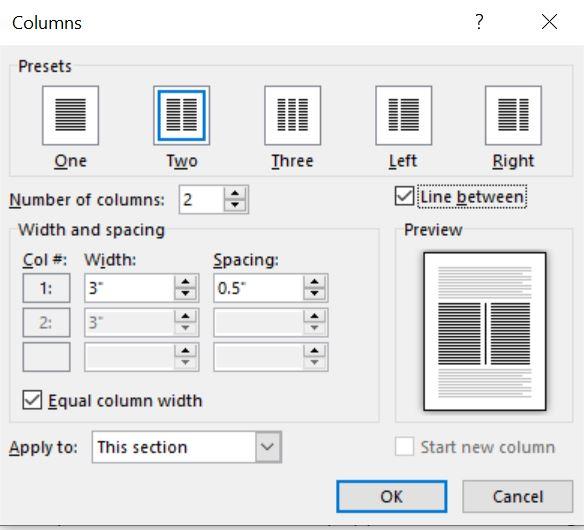
It's common to add a vertical line between columns, but first, you need columns:
- Select the paragraphs you want to arrange in columns.
- On the Layout tab, click the Columns dropdown in the Page Setup option.
- Choose Two to produce the two columns shown in Figure F.
Figure F

Two paragraphs are now arranged as columns.
Now, let's position a vertical line between the two columns as follows:
- Click anywhere inside the columns.
- On the Layout tab, click the Columns dropdown and choose More Columns (at the end of the list).
- Check the Line between option (Figure G) just about the Preview section.
- Click OK to see the results in Figure H.
Figure G
Check the Line between option.
Figure H

You can position a vertical line between columns.
Line up!
Adding a horizontal or vertical line can provide a keen visual effect that focuses or defines an element. Don't go nuts but explore the options, and you'll find adding a simple line here and there improves the readability of your documents.
Send me your question about Office
I answer readers' questions when I can, but there's no guarantee. Don't send files unless requested; initial requests for help that arrive with attached files will be deleted unread. You can send screenshots of your data to help clarify your question. When contacting me, be as specific as possible. For example, "Please troubleshoot my workbook and fix what's wrong" probably won't get a response, but "Can you tell me why this formula isn't returning the expected results?" might. Please mention the app and version that you're using. I'm not reimbursed by TechRepublic for my time or expertise when helping readers, nor do I ask for a fee from readers I help. You can contact me at susansalesharkins@gmail.com.

Microsoft Weekly Newsletter
Be your company's Microsoft insider by reading these Windows and Office tips, tricks, and cheat sheets. Delivered Mondays and Wednesdays
Sign up todayAlso see
-
Microsoft 365: A cheat sheet (TechRepublic)
-
50 time-saving tips to speed your work in Microsoft Office (free PDF) (TechRepublic )
-
How to add a drop-down list to an Excel cell (TechRepublic)
-
Cost comparison calculator: G Suite vs. Office 365 (Tech Pro Research)
-
Microsoft Office has changed, how you use it should too (ZDNet)
-
Best cloud services for small businesses (CNET)
-
Best to-do list apps for managing tasks on any platform (Download.com)
-
More must-read Microsoft-related coverage (TechRepublic on Flipboard)
How to Add Vertical Line in Google Docs
Source: https://www.techrepublic.com/article/how-to-add-vertical-lines-to-a-word-document-using-office-365/
0 Response to "How to Add Vertical Line in Google Docs"
Post a Comment